Installing Magento [version 2.2.6]
You need to follow these steps to install Magento:
1. Download the installation files from the site of the vendor. Magento can be obtained from:
http://www.magentocommerce.com/download
Choose to download the full release of the software by selecting one of the archived packages from the drop-down menu next to Full Release: (magento-MagentoVersion.zip, magento-MagentoVersion.tar.gz, magento-MagentoVersion.tar.bz2) and click on the Download button.
2. Once you have downloaded the archive that contains the installation, you need to upload it to your hosting space.
You can either extract all the files from the downloaded archive and upload them, or you can upload the archive and use the web hosting Control Panel's File Manager to extract the package.
The best way to upload big files or multiple files is via FTP. If you are not sure how to upload the files, please check the Uploading files section from our online documentation.
If you are installing the application in your main domain, or in a subdomain, you may need to delete the default index.php file first. You can do this either via FTP or through your web hosting Control Panel's File Manager.
3. Create a new MySQL database and user for the Magento application. For security reasons, MySQL databases and users can be created only through the hosting Control Panel. Detailed instructions on the process are available in our Creating a MySQL database/user article.
Note: According to the official Magento requirements page, MySQL 8 is supported after Magento 2.4, so you can use only MySQL 5 databases for Magento 2.2.6.
Once you have the database and MySQL user created, you should associate the MySQL user with the database by following the instructions from our Associating a MySQL user with a database article. Unless you have a reason to do otherwise, you can select all available privileges for the new MySQL user.
4. Magento 2.2.6 requires PHP 7.1 or an upper version. You can check the PHP version used by your domain/subdomain through the hosting Control Panel -> PHP Settings section. Changing the PHP version is covered in the PHP version article.
5. To start the installation wizard, open in your browser the URL where the extracted Magento files are located.
6. On the first step of the installation, you have to agree to the Magento license terms. Click the Agree and Setup Magento button.
7. Magento will check if the server environment meets the installation requirements. Click the Start Readiness Check button. Once the check completes, click Next.
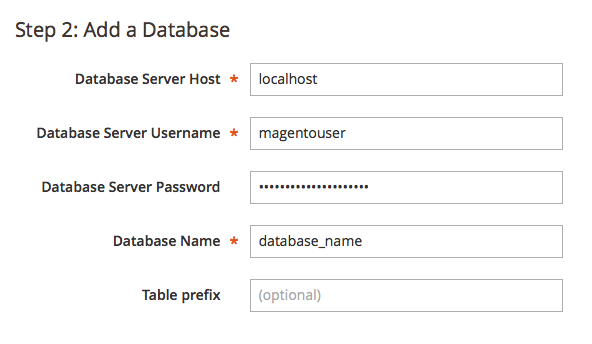
8. On the following page - Add a Database - use the following settings:
Database Server Host: localhost
Database Server Username: You need to enter the MySQL username you created at your web hosting Control Panel's MySQL section for your Magento application.
Database Server Password: You need to enter the password you assigned to your MySQL user.
Database Name: You need to specify the MySQL database you created for your Magento application.
Tables Prefix: You do not need to modify this setting if you are installing Magento for the first time under this account.

Click Next.
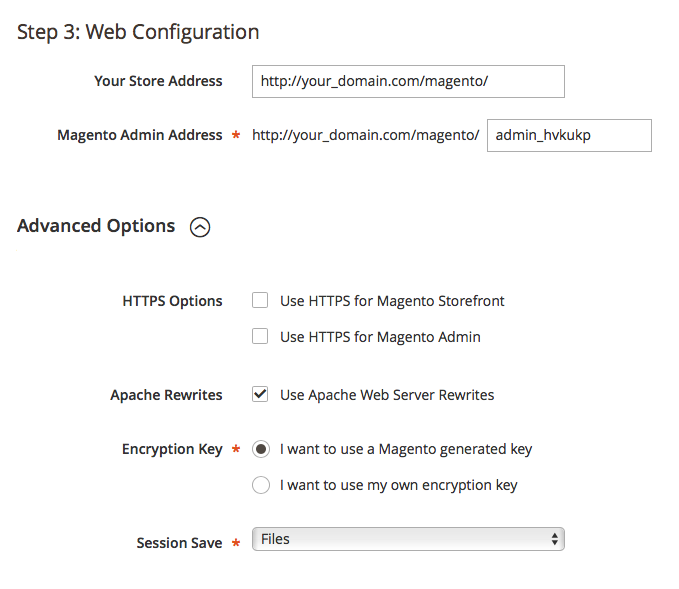
9. Web Configuration step.
Your Store Address: You can leave the default value if you are installing Magento to the same directory where you have extracted the installation files.
Magento Admin Address: Choose a directory name for the Magento administration interface.
Advanced Options:
HTTPS Options – Check the Use HTTPS for Magento Storefront option if you own a certificate for your domain and wish to use SSL. If you wish to use an encrypted connection for the administration interface as well, check the Use HTTPS for Magento Admin option.
Apache Rewrites - mod_rewrite is installed on our servers, so you can check this option to enable search engine friendly URLs for your site.
Encryption key - If you wish you can enter a key for Magento to use for encrypting passwords, credit card numbers and other information. If you select the I want to use a Magento generated key option, the system will automatically generate a key which will be shown to you on the last step of the installation.
Session Save - You can choose the location where the user session information is stored – as files on the hosting space (Files) or as entries in the database (Db).

Click Next.
10. On the next step - Customize your store - choose the preferred Store Default Time Zone, Store Default Currency and Store Default Language settings for your installation from the drop-down menus and click Next.
11. On the next step - Create Admin Account - you have to create an administrative account. Fill out the following fields:
New Username: Enter an username for the administrative account.
New Email: Enter an email address for the administrative account.
New Password and Confirm Password: Enter a password.
Click Next.
12. Click Install Now.
You are ready! - Magento was successfully installed. Write down the automatically generated encryption key (if you have not entered your own one in the Web Configuration step) and store it in a safe place. For security reasons, we do not recommend to store it in a file on your hosting space.
13. Open the file /vendor/magento/zendframework1/library/Zend/Cache/Backend/File.php using the File Manager of the online Control Panel and change
protected $_options = array(
'cache_dir' => null,to
protected $_options = array(
'cache_dir' => '/tmp',
14. Open the file /vendor/magento/framework/Filesystem/DriverInterface.php using the File Manager of the online Control Panel and change the following two lines:
const WRITEABLE_DIRECTORY_MODE = 0770;
to
const WRITEABLE_DIRECTORY_MODE = 0775;
and
const WRITEABLE_FILE_MODE = 0660;
to
const WRITEABLE_FILE_MODE = 0664;
15. Select all directories of the Magento package, and change their permissions (recursively) to 775.
16. You can click on Launch Magento Admin to open the Magento administration interface.
Important notice: You should monitor the site of the software vendor for any security updates of your installed application.