WordPress Manager
The WordPress Manager section of the hosting Control Panel is an amazing assistant when it comes to WordPress. The section has three tabs aimed to give you control over your WordPress installations:
Further below, you will find more information about each tab and some of the actions that you can perform there.
Most actions within the section are performed with WP-CLI commands, and a log file of the commands is available in the ~/.wp-cli/history.log file in your account. This file can be accessed only via FTP or SSH. If an action takes more than 30 seconds to complete, it will continue to run in the background, and a notification will be displayed with a link for checking its status.
If you would like to find more information related to WordPress, please check the WordPress section of our online documentation.
Managing WordPress
In the Manage tab of the hosting Control Panel > WordPress Manager, you can find a list of the WordPress installations added (automatically and manually) for management, scan your account for WordPress installations and add them to the list, and access the management screen for a particular WordPress installation.
Listing WordPress installations
When you access the hosting Control Panel > WordPress Manager, you will see a list of the WordPress installations that have been added for management on your account. For each listed WordPress installation, you will see its site title, URL, path to its directory on the account, version of WordPress, and a Manage button. To start managing a specific WordPress installation with WordPress Manager, just click on the Manage button next to the WordPress installation. If you only have one managed WordPress installation on your account, you will be taken directly to its management page.
Since it is important to use the latest version of software applications for security, compatibility, and performance reasons, WordPress Manager can help you keep an eye on your WordPress version by displaying an ![]() (OK) icon next to the version of WordPress installed on your website that will indicate if the WordPress core is running the latest version, or a
(OK) icon next to the version of WordPress installed on your website that will indicate if the WordPress core is running the latest version, or a ![]() (Warning) icon if an update is available. The update can be easily applied via the management page for the specific WordPress installation by pressing the Manage button for it and clicking on the Update button next to the WordPress version.
(Warning) icon if an update is available. The update can be easily applied via the management page for the specific WordPress installation by pressing the Manage button for it and clicking on the Update button next to the WordPress version.
By default, WordPress Manager will scan your account regularly and automatically for unmanaged WordPress installations (versions 3.9 and newer) and display a notification message with details and instructions to add them if such installations are found after you log in to the hosting Control Panel.
You can also scan your account for WordPress installations manually. For more details on the scanning process, please refer to the Adding existing WordPress installations for management article from our online documentation.
Managing a WordPress installation
Clicking on the Manage button for a particular WordPress installation within the hosting Control Panel > WordPress Manager will take you to the management page for that WordPress installation. You will find the following sections on the management page which provide useful information and allow you access to different features and tools:
We will explain what is included in each section below.
Note: For misconfigured or corrupted WordPress installations, only limited information or features may be available, like backups and general information. If the WordPress Manager can determine the cause of the problem, it will list it in an informational message. A button to fix the problem will also be displayed if the problem can be fixed by the WordPress Manager.
Info
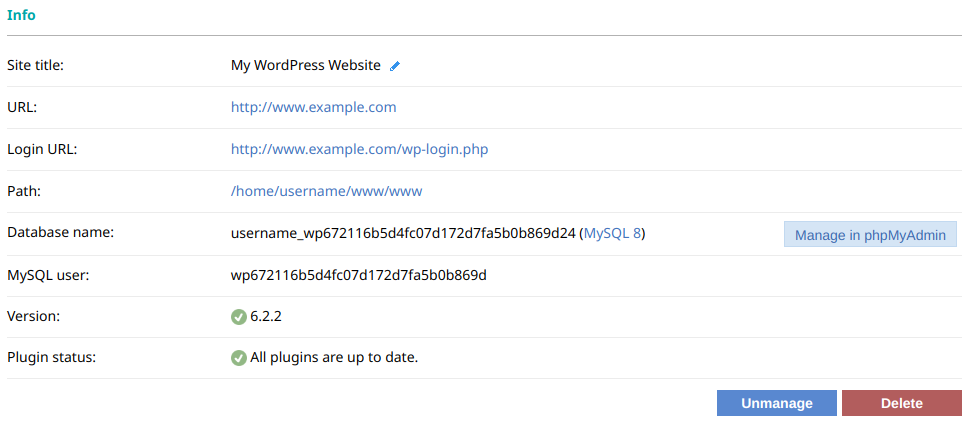
The Info section shows the following useful information about your WordPress installation:
- Site title - Here you will see the title of your website (e.g. "My WordPress Website"). You can change the title of your website by clicking on the pencil icon (
 ) next to the title.
 - URL - The URL of your website will be listed here (e.g. "https://www.example.org/").
- Login URL - Here you can find a link for quick access to the WordPress Dashboard (e.g. "http://www.example.org/wp-login.php").
- Path - The directory where your WordPress installation resides on your account will be listed here. (e.g. "/home/example/www/www").
- Database name - The name of the database associated with your WordPress installation will be listed here along with MySQL version of the database. If the database is running on MySQL 5, a button to migrate the database to MySQL 8 will appear next to the database name. You can use it to have the WordPress Manager migrate the database to MySQL 8 for you.
- MySQL user - You will see the name of the MySQL user that is used for accessing your WordPress database here.
- Version - Here you will find the version of WordPress that is currently installed on your website. If your website runs an outdated version of WordPress, a
 (Warning) icon will be displayed next to the current version number, and a button to the right, allowing you to upgrade WordPress to the latest stable version.
 - Plugin status - The WordPress Manager will check the versions of all plugins which can be updated via WP-CLI. Based on the result, a different icon and message will be displayed. For more information about this feature, you can check the Updating plugins via the hosting Control Panel > WordPress Manager section from our Managing WordPress plugins article.
- Manage in phpMyAdmin - Clicking this button will open the WordPress database for management in phpMyAdmin.
Below the list of useful information, you will find two buttons:
- Unmanage - This button allows you to remove the WordPress installation from the hosting Control Panel > WordPress Manager. It will not remove the WordPress installation from the hosting account.
- Delete - By using this button, you can have WordPress Manager delete everything in the directory of the WordPress installation, as well as the database of your WordPress installation. Please note that any files in the directory and records in the database not related to the WordPress installation will also be deleted. A temporary automatic backup will be generated when a WordPress installation is deleted via the WordPress Manager, which can be very useful in case of an erroneous deletion.
Updates
If updates are available for the WordPress core or plugins, the Info section will look like this: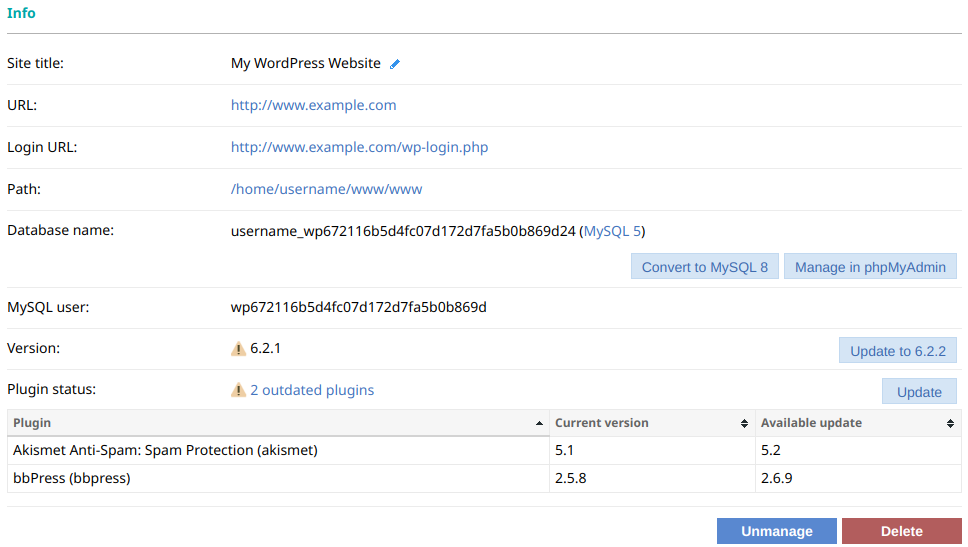
Clicking on any of the Update buttons will update the items (core, plugins, themes) the button is related to. If you are running a MySQL 5 database, the WordPress manager can automatically convert the database to MySQL 8 and update your WordPress configuration settings to work with the new database. This can be done by clicking the Convert to MySQL 8 button.
Site URL
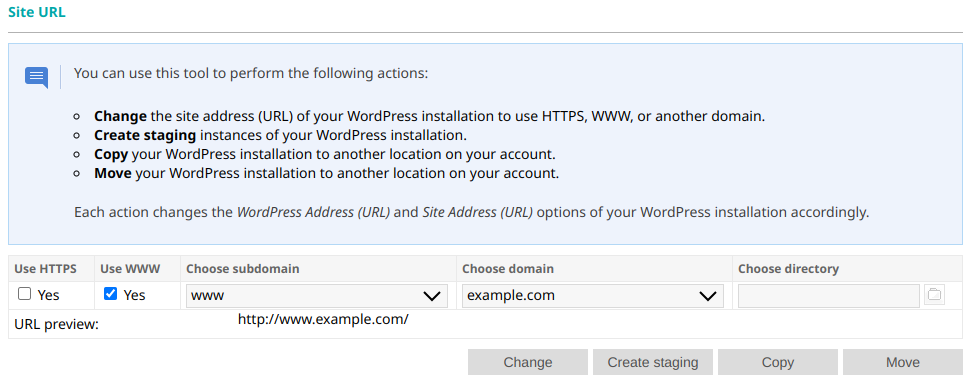
The Site URL section allows you to perform different actions from the same interface using the available action buttons. You can create and use WordPress staging sites or change the Site URL of your WordPress installation, force HTTPS, add or remove the "www." prefix, or change the domain/subdomain/subdirectory. You can also Copy or Move your WordPress installation. More details about this functionality are available in our Moving WordPress between directories or subdomains on the hosting account article.
The following options are available in the Site URL section:
- Use HTTPS - This option allows you to configure WordPress to work over HTTPS instead of HTTP. To use this option, a valid SSL certificate for the hostname must be installed on the server.
- Use WWW - This option gives you the ability to prefix www. to the website address of your WordPress installation. This option is available only for domains.
- Choose subdomain - You can choose from a list of the subdomains created through the hosting Control Panel > Subdomains section.
- Choose domain - This option allows you to choose a domain from a list of domains associated with the account.
- Choose directory - This option allows you to specify the directory of the WordPress installation. If you wish to have the WordPress installation within the root of the domain/subdomain, you should leave it blank.
Staging
The WordPress Manager supports staging instances which allow you to clone your WordPress installation to another domain/subdomain, so you can perform tests without affecting the production website.
If there are any staging instances of the selected WordPress installation, they will be listed in the Staging section of its management page. For each staging instance, the title, URL, and path will be listed as well as two buttons - Manage and Set as live.

The Set as live button allows you to merge the staging WordPress installation with the live one. When you click this button, you will be able to choose whether to delete the content of the live site and its folder before setting the staging site as live.
The Manage button will take you to the management page for the staging instance.
More details about using staging instances within the WordPress Manager can be found in our Creating and using WordPress staging sites article.
Backup
The Backup section allows you to create a backup of your WordPress installation or view a list of all backups for the selected WordPress installation which you can download, delete, or restore from.
By design, the WordPress Manager section generates an automatic backup before performing operations which may break your website or affect its uptime after completion (like changing the Site URL, setting a staging website as live, or deleting a WordPress installation). In such events, you can restore your website with a single click from the automatically created backup and minimize restoration efforts. These backups will be kept only temporarily (for seven days) on the server, and a reminder about this will be displayed in the management page of the WordPress installation. The date after which such a backup will be deleted can be found by clicking on the ![]() (Warning) icon next to the backup creation date.
(Warning) icon next to the backup creation date.
For every WordPress backup, you can find the date and time it was created on, a description, and three buttons - Download, Restore, and Delete. The description will contain useful information about the backup if it was generated automatically by the WordPress Manager. You can change the description by clicking on the ![]() (Edit) button next to it. You can copy the path to the actual backup file on the server by clicking on the Copy button (
(Edit) button next to it. You can copy the path to the actual backup file on the server by clicking on the Copy button (![]() ) next to the description of the backup. The Download, Restore, and Delete buttons allow you to do exactly that - restore your website from that backup or download/delete the backup.
) next to the description of the backup. The Download, Restore, and Delete buttons allow you to do exactly that - restore your website from that backup or download/delete the backup.
There are also two buttons below the backup list - Delete all and Backup now. The Delete all button allows you to delete all backups for the selected WordPress installation, and the Backup now button allows you to create a backup of the current state of your WordPress website.
The message which will be displayed on top of the WordPress management page if a temporary automatic backup is available for your WordPress installation can be seen below:
All backups generated from the WordPress Manager section are stored in the wp_backups directory of your account's Private directory. You access this directory using your favorite FTP client or the hosting Control Panel > File Manager section.
You can find additional information and step-by-step instructions on how to create, download, and restore from WordPress backups in our Create, download, and restore from WordPress backups article.
WordPress administrators
The WordPress administrators section allows you to view a full list of the administrators on your WordPress website, log in to the WordPress Dashboard as each of the listed administrators, or set a new password for each of the administrators from the list.
The Username, Display name, E-mail, and Creation date will be listed for each administrator along with two buttons - Log in and Password. The Log in button gives you the ability to log in to the Dashboard of the particular WordPress installation as that administrator, while the Password button gives you the ability to change the password for that administrator.
Tools
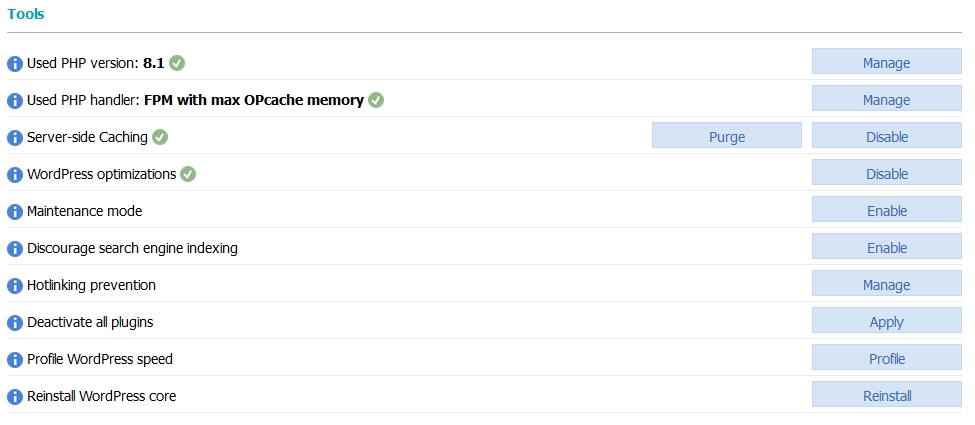
In this section you can find various tools for easy management of your WordPress installation, like:
- Used PHP version - This tool indicates the PHP version currently set for the domain/subdomain and will display a
 (Warning) icon if switching to a newer PHP version is advisable due to performance, security, and compatibility reasons. The Manage button will take you to the hosting Control Panel > PHP Settings section and display the subdomain of the WordPress installation. Please note that some plugins/themes may not be compatible with the PHP version recommended by the WordPress Manager.
 - Used PHP handler - Here you will see the PHP handler set for the domain/subdomain. If the CGI PHP handler is set, a
 (Warning) icon will be displayed with information about the benefits of using FPM with OPcache. The Manage button will take you to the hosting Control Panel > PHP Settings section and display the subdomain of the WordPress installation. The recommended FPM with OPcache PHP handler may not work correctly for some applications, so you should consider using the CGI PHP handler if that is the case.
 - Server-side Caching - This tool displays information about the server-side cache setup for the WordPress installation. Server-side caching can help reduce the loading time of your website and improve the visitor experience. Clicking the Enable button will enable the recommended WordPress optimizations, enable server-side caching for the domain/subdomain, and install and activate the Server-Side Cache Autopurge WordPress plugin. More information about the specific feature is available in our Enabling server-side caching for WordPress article.
- WordPress optimizations - The WordPress optimizations tool checks if our recommended set of rules is added to the main .htaccess file of the WordPress installation. These rules enable output compression, instruct browsers to cache data, and prevent (404) Not found error handling by WordPress for reduced CPU usage. The Enable button for this tool will add that set of rules to your WordPress installation's .htaccess file. More details about the changes performed by this tool are available in our Optimizing WordPress article.
- Access to XML-RPC - Access to the xmlrpc.php file is restricted on our servers by default due to security reasons. Some plugins or themes may require access to this file, so you can use the Enable button for this tool to enable access to this file. You can learn more about it in our Enable access to XML-RPC article.
- Maintenance mode - Hitting the Enable button will put the WordPress website in maintenance mode. When in Maintenance mode, the website will display a temporary page to all visitors, informing them that maintenance is being performed. This is useful when you need to perform upgrades or other sorts of updates on your website.
- Discourage search engine indexing - Clicking the Enable button will create special search engine instructions that will discourage web crawlers from crawling the website. The instructions wil be stored in a file called robots.txt. Please note that it is up to the web crawler vendor and operator to respect those instructions.
- Hotlinking prevention - This tool allows you to prevent other websites from using your images without autorization. Clicking the Manage button will take you to the Hotlinking prevention section of the Control Panel, where you will be able to specify the types of files you need to protect.
- Deactivate all plugins - As the name of this tool suggests, it allows you to disable all WordPress plugins with the click of the Apply button. This may be one of the best solutions when troubleshooting problems with your website and you are not sure if the problem is caused by one or multiple plugins. In general, you can find details on troubleshooting plugin issues in our Managing WordPress plugins article.
- Profile WordPress speed - This tool allows you to profile the performance of your WordPress installation based on the profile WP-CLI command.
- Reinstall WordPress core - This tool will re-install the WordPress core. This can help if any of the core files get corrupted.
Security
The Security section allows you to easily manage some security settings for your WordPress website.

The options in the security section are as follows:
- SSL Certificate - This option allows you to manage the SSL certificates for the subdomain where your WordPress website is installed. Clicking the Manage button will open the SSL/HTTPS section in the Control Panel, where you can manage the SSL certificates on the account and issue free Let's Encrypt certificates.
- Dashboard login protection - This option allows you to add a second layer of protection to your WordPress Dashboard by limiting access to the wp-login.php file of the WordPress installation only to authorized users. The Manage button for this tool will redirect you to the management page for the users authorized to access the wp-login.php file via the Password protection section of the hosting Control Panel. You can learn more about this tool in our Improving WordPress security article.
- Secure content directories - The Apply button for this tool adds a code block to the .htaccess file of the WordPress installation that prevents the execution of PHP scripts in the wp-admin/includes, wp-content/uploads, and wp-includes directories. The code block is designed to harden the WordPress installation against hacking attempts without affecting the normal operation of WordPress. It is possible for some plugins to place PHP scripts in the folders listed above, which may cause the plugins to malfunction. In such cases, you should consider removing the code block added by this tool. More information on this tool is available in the Improving WordPress security article from our online documentation.
- Access to XML-RPC - Access to the xmlrpc.php file is restricted on our servers by default due to security reasons. Some plugins or themes may require access to this file, so you can use the Enable button for this tool to enable access to this file. You can learn more about it in our Enable access to XML-RPC article.
Debugging
If you are experiencing problems with your website, or you are testing out new code, the Debugging section will help you identify what might be causing an issue. The Debugging section allows you to enable and disable specific debuggin options in WordPress:
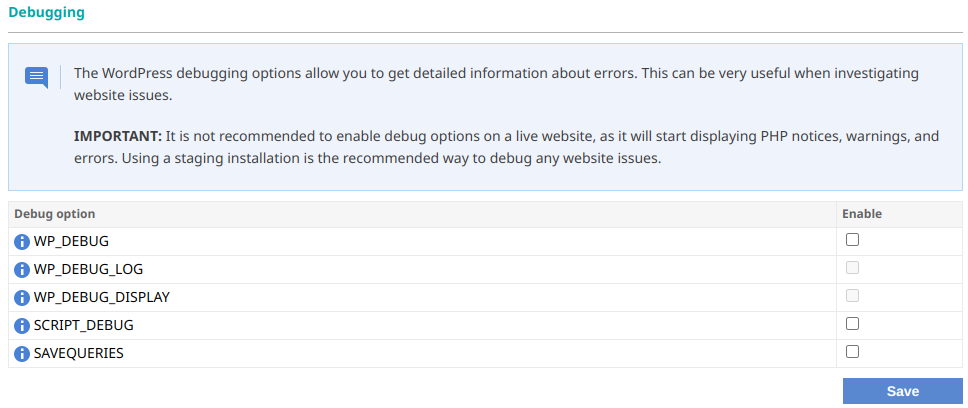
The available debugging options are as follows:
- WP_DEBUG - Enabling this option will cause all PHP errors, warnings, and notices to be displayed.
- WP_DEBUG_LOG - Enabling this option will log all all PHP errors, warnings, and notices to be saved in a log file.
- WP_DEBUG_DISPLAY - This option works with the WP_DEBUG option, and is enabled by default. If you disable this option, but the WP_DEBUG option is enabled, PHP errors, warnings, and notices will not be displayed. This can be used in conjunction with WP_DEBUG_LOG to log errors without displaying them.
- SCRIPT_DEBUG - Enabling this option will cause WordPress to use the development versions of CSS and JS files instead of the minified versions that are normally used. This option is useful when you are updating the code in the CSS and JS files and need to see the results immediately.
- SAVEQUERIES - Enabling this option will save the database queries to an array that can be displayed and analyzed. The array is stored in the global $wpdb->queries.
WordPress health
The WordPress health section provides information that can help you diagnose problems with your WordPress installation. Some of the checks made are - checksum verification for the WordPress core, scanning of PHP files for popular malicious strings, etc.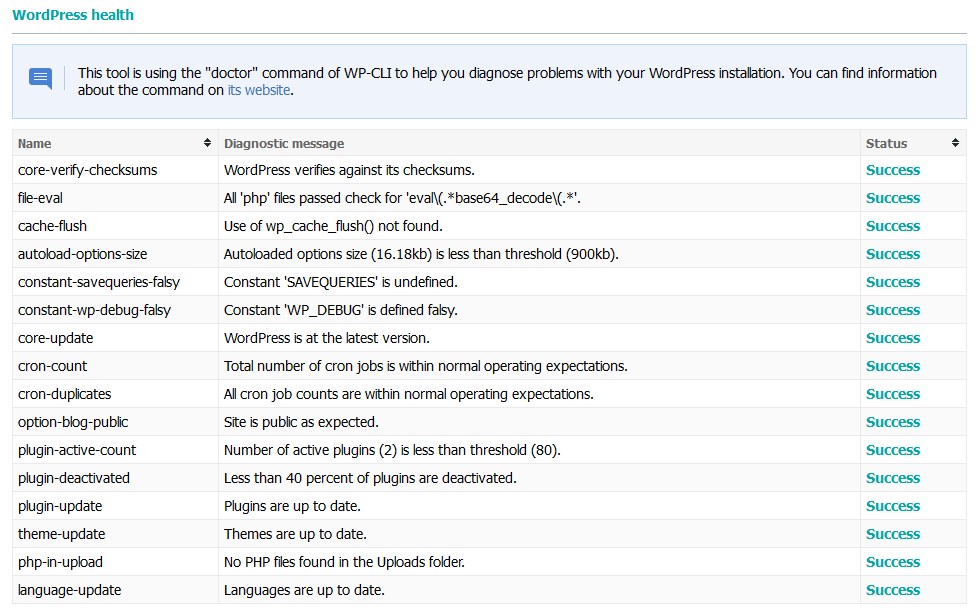
The diagnostics are run using the doctor WP-CLI command.
Installing WordPress
The Install tab of the hosting Control Panel > WordPress Manager allows you to easily install WordPress on your account.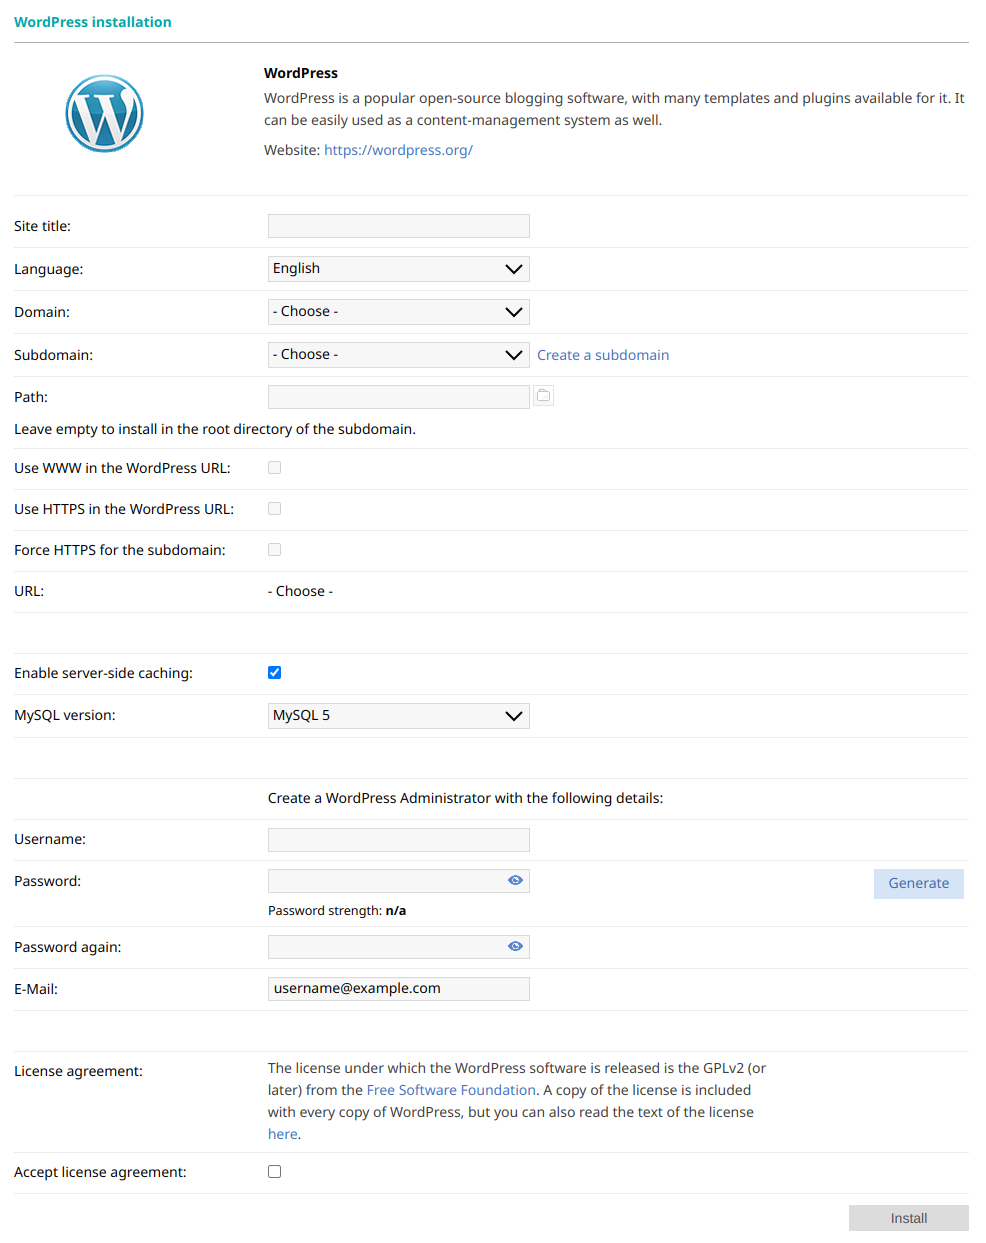
We have a step-by-step tutorial on the process in our Installing WordPress article.
Importing WordPress
The Import tab of the WordPress Manager gives you the option to import WordPress backups generated from the hosting Control Panel > WordPress Manager. 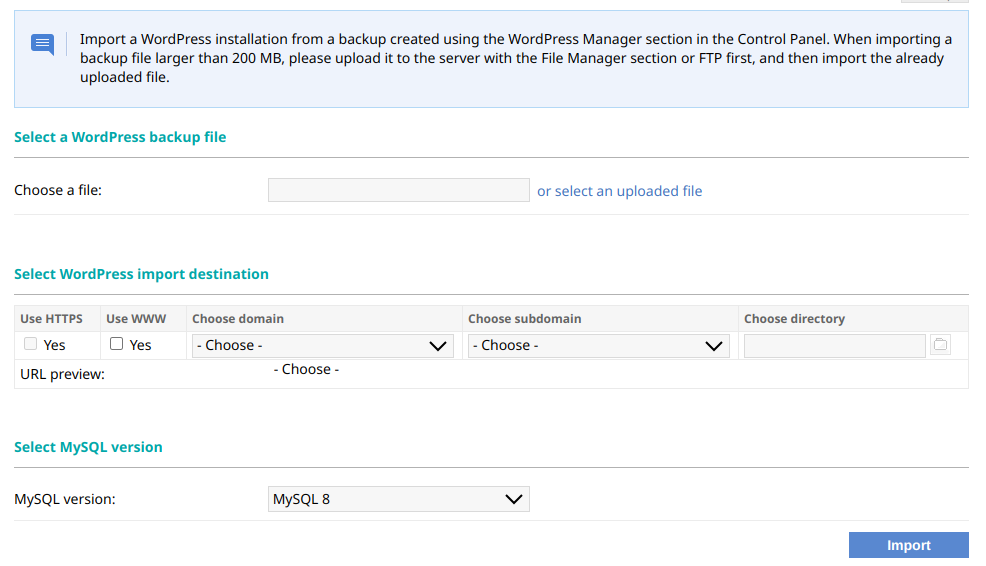
In our Creating, downloading, and restoring from WordPress backups article, you can find instructions on how to create and use the WordPress backups that you have created through the hosting Control Panel > WordPress Manager. The Import tab can also be used to migrate a WordPress website from one account on our servers to another. The process is explained in details in our Moving WordPress between hosting accounts on our servers article.