Managing WordPress plugins
In this article, you can find the following information about WordPress plugins:
- What is a WordPress plugin?
- How to find WordPress plugins?
- How to install and activate a WordPress plugin?
- Installing and activating a WordPress plugin via the Dashboard
- Activating a WordPress plugin via the Dashboard
- Installing and activating a WordPress plugin with WP-CLI
- Activating a WordPress plugin with WP-CLI
- Installing a WordPress plugin by uploading it to your account and activating it
- Where to find all plugins already installed on WordPress?
- How to update a WordPress plugin?
- Utilizing automatic plugin updates
- Updating plugins via the hosting Control Panel > WordPress Manager
- Updating a plugin through the WordPress Dashboard
- Updating a plugin with WP-CLI
- Updating a plugin via the File Manager or FTP
- How to downgrade a WordPress plugin?
- Downgrading a plugin through the WordPress Dashboard
- Downgrading a plugin with WP-CLI
- Downgrading a plugin via the File Manager or FTP
- How to deactivate a WordPress plugin?
- Deactivating a plugin through the WordPress Dashboard
- Deactivating a plugin using WP-CLI
- Deactivating all plugins via the hosting Control Panel > WordPress Manager
- How to delete a WordPress plugin?
- Deleting a plugin through the WordPress Dashboard
- Deleting a plugin using WP-CLI
- Deleting a plugin via the File Manager or FTP
- How to perform bulk actions with plugins?
- What are must-use plugins?
- How to handle issues with a WordPress plugin?
- How to secure a WordPress plugin?
What is a WordPress plugin?
WordPress plugins are essentially script bundles that add or remove functionality to a WordPress installation. Some plugins allow you to disable or modify existing functions and features of a WordPress installation, while others allow you to add new features or functions. You can convert your WordPress installation to a forum, install a WYSIWYG website builder to build a complex website very easily, or add custom forms. There are plugins available for almost everything you can imagine.
The best thing about plugins is that you can have multiple plugins active at once, so you can add complexity to your website and add or remove features whenever you want. Of course, when you add more plugins, you should ensure that the plugins you use are compatible with each other, your theme, and the version of WordPress used on your website. If you encounter compatibility issues, you can always report them to the developers of the plugin/s and theme, so they can release an updated version where the issues are resolved.
How to find a WordPress plugin?
There are tens of thousands of freely available plugins for activation directly via the WordPress Dashboard. You can also download these plugins from the WordPress plugin repository. There are also commercial plugins which can be obtained through the websites of their vendors or through plugin-selling websites. If you need a feature that is not already available or supported by a plugin, you can always hire a plugin developer to create it for you.
When considering a plugin for your WordPress website, you should also check if the plugin is updated regularly, and if assistance is offered by its developers, support team, or community. Plugins without regular updates are very likely to stop working due to compatibility issues with newer versions of your WordPress core, theme, or other plugins. This is also why the developers and community of the plugin are important as they may offer solutions to all kinds of problems that you may encounter while using the plugin. You can also seek help from the official WordPress community; however, communities of the specific plugin should be more knowledgeable and capable of helping you with issues related to that plugin.
How to install and activate a WordPress plugin?
You can install plugins on your website in one of three ways - through the WordPress Dashboard, using the WordPress command-line interface - WP-CLI, or by manually uploading them to the account. After a plugin is installed, it can be activated only via the WordPress Dashboard or WP-CLI. Please note that additional steps may be required for the proper installation or activation of some plugins, like adding files, installing extra plugins, or purchasing a license. You should refer to the official instructions of the plugin that you wish to use on your website for more information.
A staging instance can be used to install and test new plugins on an existing WordPress website. You can find more details on how to set up a staging instance of your existing WordPress website via the hosting Control Panel in our Creating and using WordPress staging sites article.
Installing and activating a WordPress plugin via the Dashboard
The easiest way to install a new plugin is via the WordPress Dashboard. All you need to do is log in to your WordPress Dashboard (you can access it by adding "/wp-admin" to your website's URL - for example, http://your_domain.com/wp-admin) or use the "Log in" feature available in the hosting Control Panel > WordPress Manager as explained in our Managing WordPress administrators article.
Once you have logged in, go to the Plugins > Add New section.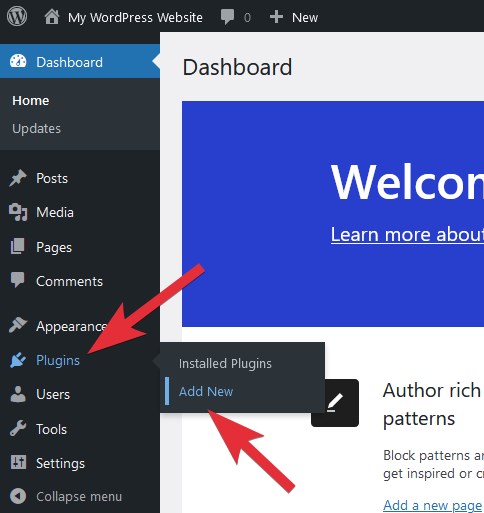
There will be two installation options available depending on whether your new plugin is listed in the public WordPress repository or not.
If the plugin is available in the WordPress plugin repository, you can use the search field in the WordPress Dashboard:
After you find the plugin that you wish to install, hover over its block, and use the Install Now button.
You can use the More Details button to view more details about the plugin, which will basically open the plugin's page from the WordPress repository in a pop-up window within the WordPress Dashboard. There you will also find an Install Now button that you can use to install the plugin.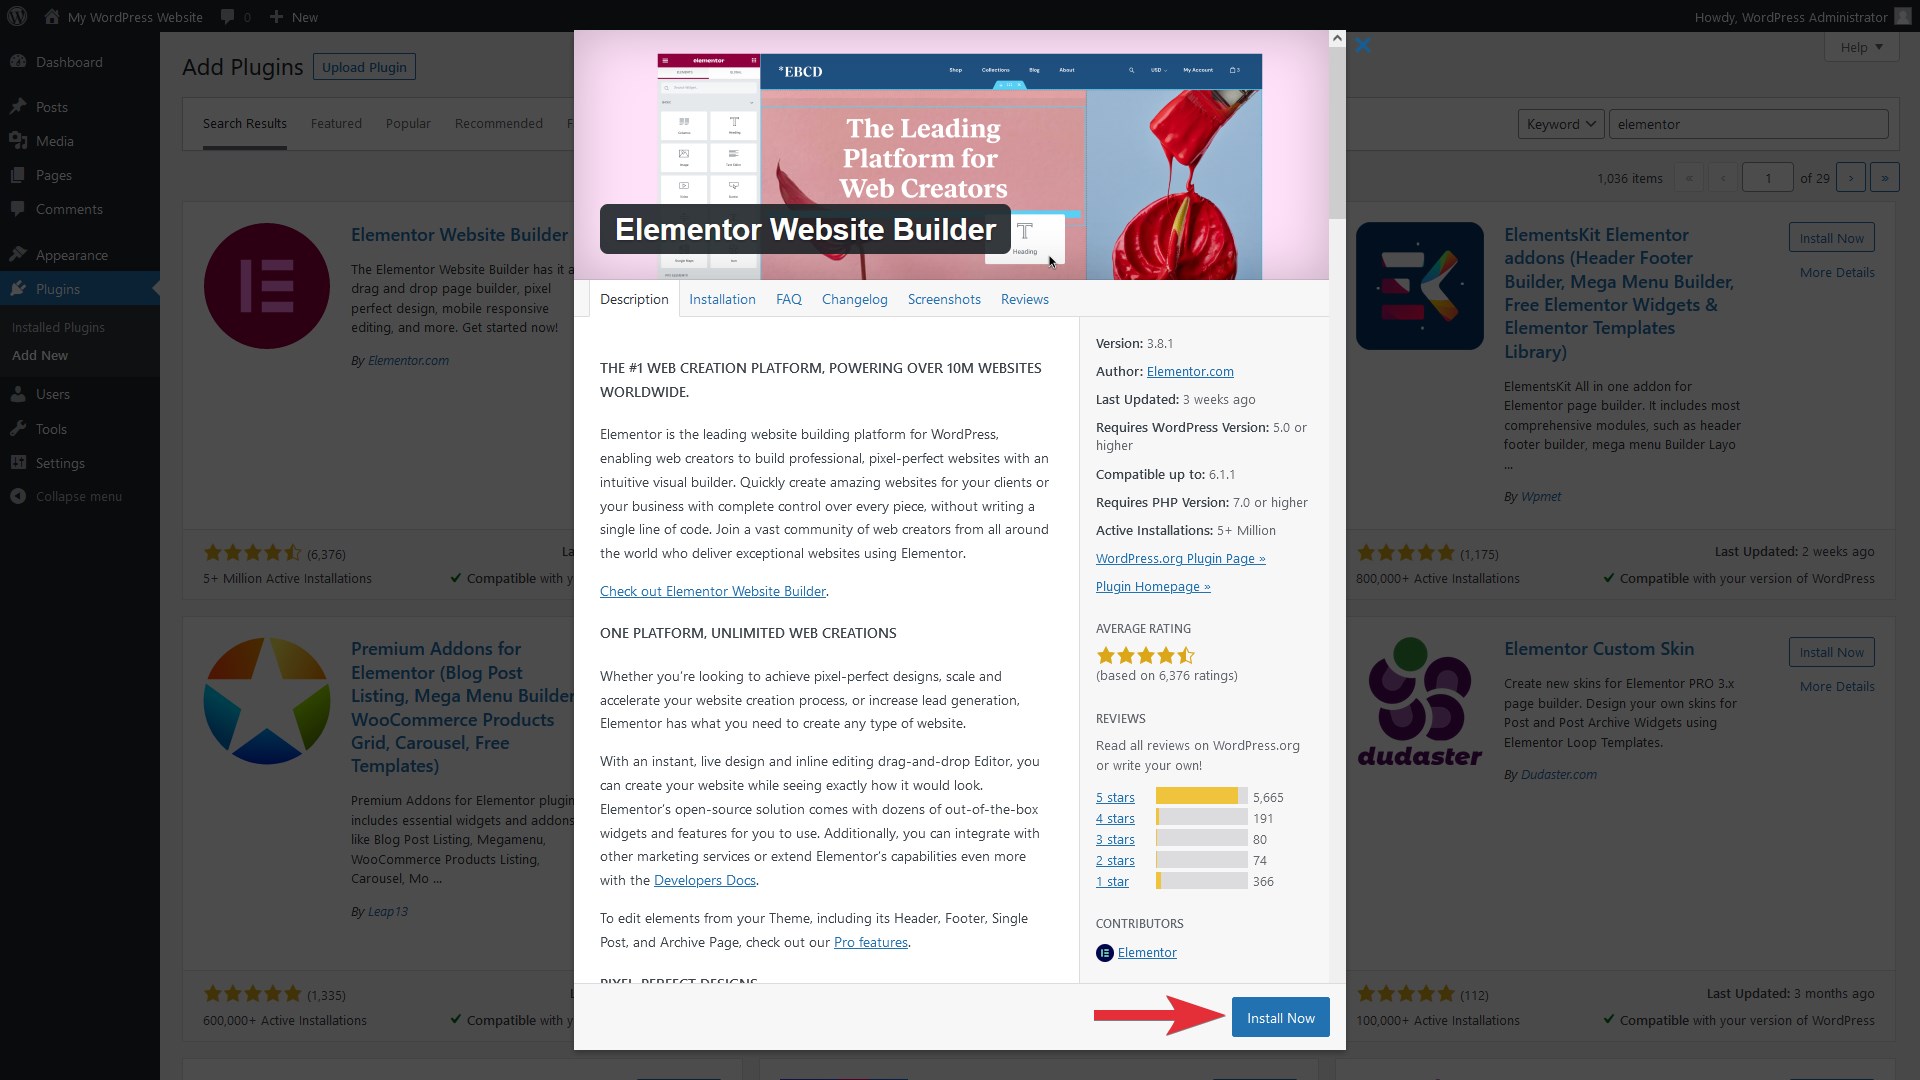
In case the plugin that you wish to install is not present in the WordPress repository, you will need to obtain it in a ZIP format from its vendor. In the below example, we are using the ZIP file of the free Elementor Website Builder plugin.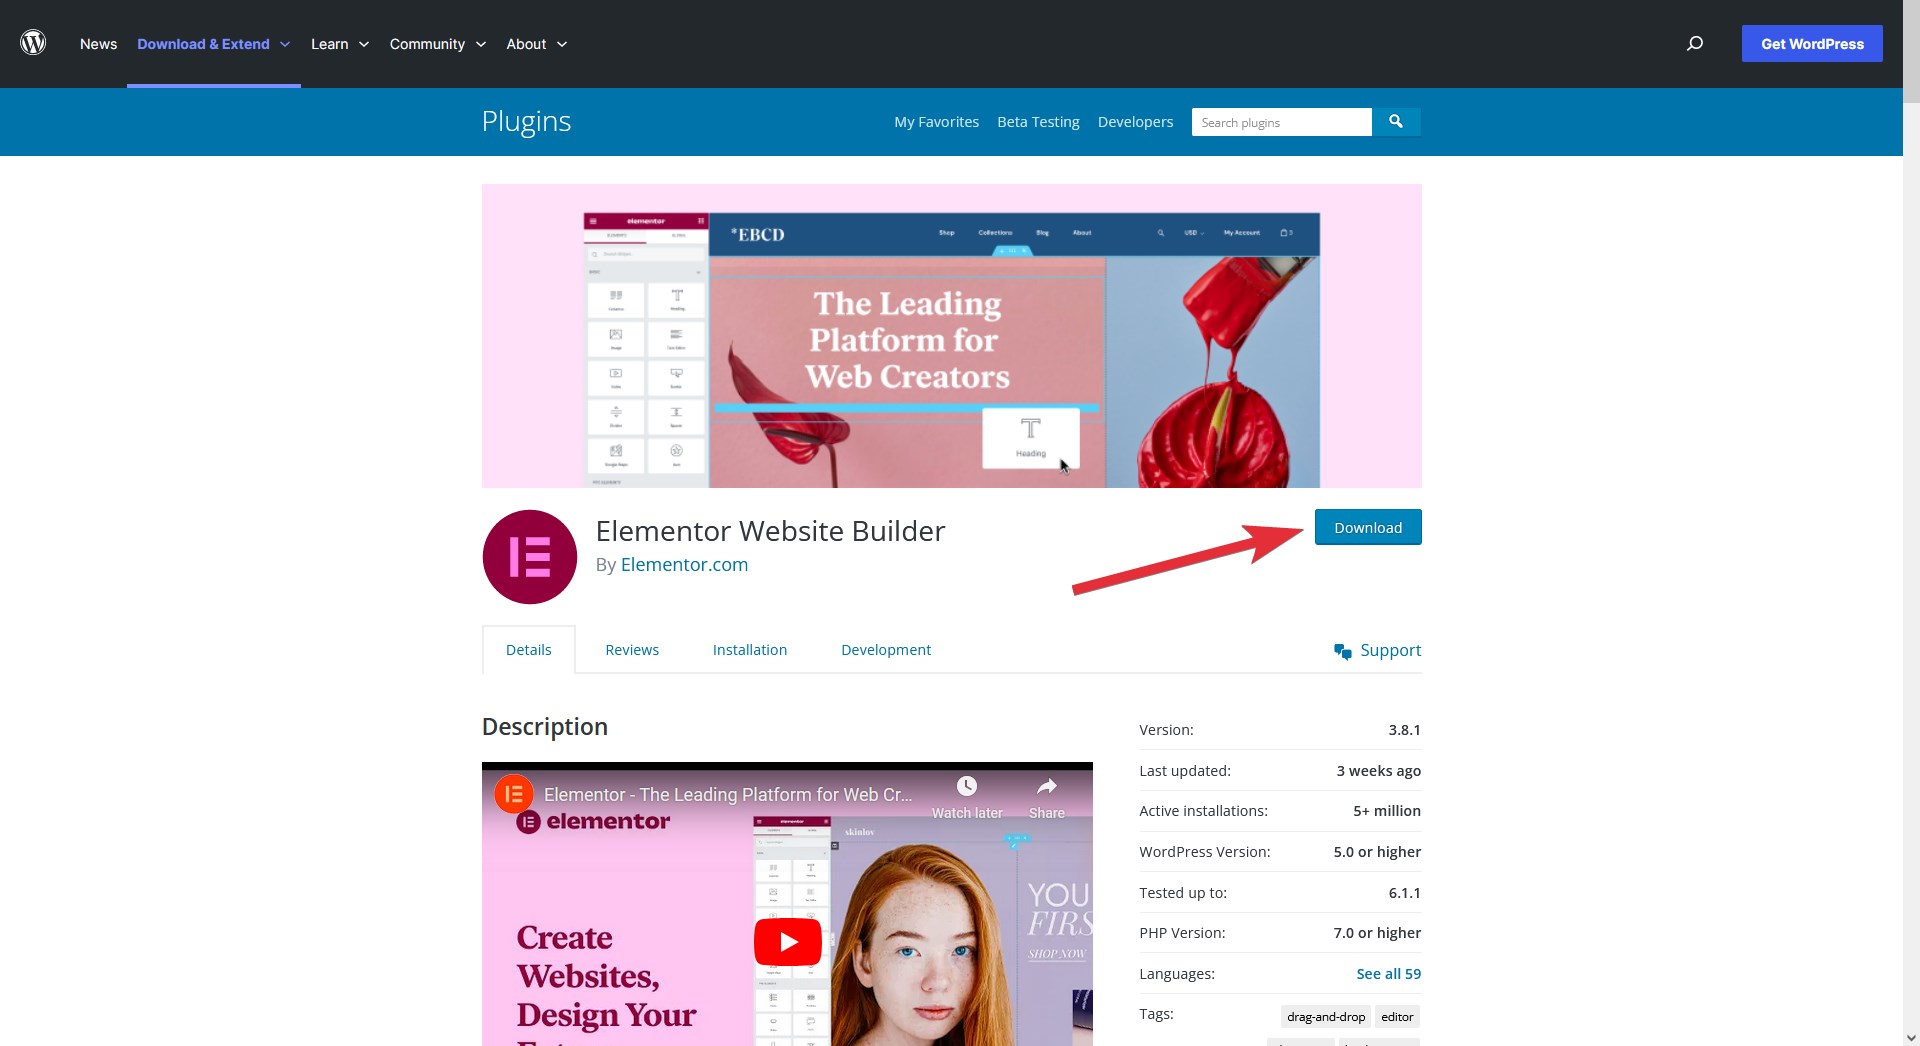
Once you have the ZIP file of the plugin that you wish to install, click on the Upload Plugin button within the Add Plugins page of the WordPress Dashboard, and an upload form will be displayed.
Click on the Browse button, and locate the ZIP file on your device, or just drag the file from your device to the Upload Plugin form. Once the file is selected/detected, all you have to do is click on the Install Now button.
Your new WordPress plugin should now be installed successfully, and all that is left is to activate it by simply clicking on the Activate button:
If you installed the plugin via a ZIP file, you can use the Activate Plugin button from the screen that indicates the installation of the plugin was successful: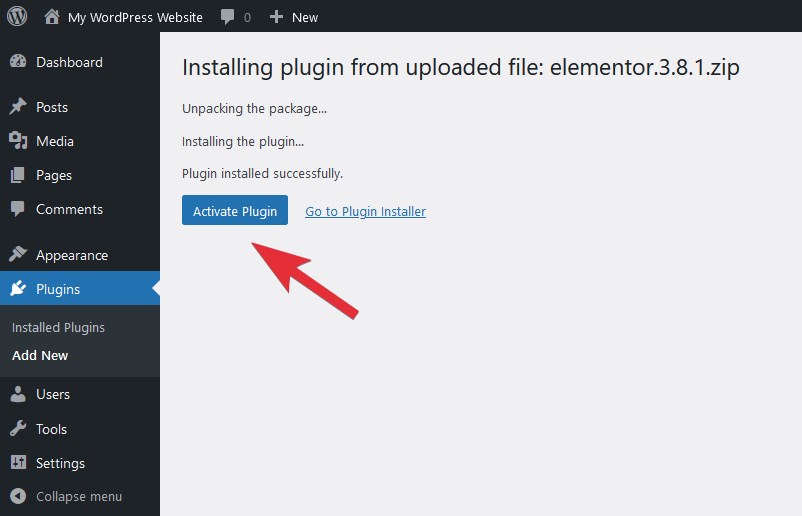
You can also activate installed plugins from the WordPress Dashboard > Plugins > Installed Plugins section:
After the plugin is activated, you should see a message that the activation was successful:
Installing and activating a WordPress plugin with WP-CLI
The Command Line Interface for WordPress (WP-CLI) is supported on our servers by default for all hosting accounts. It provides the ability to use a command-line interface for the management of WordPress websites. You can find some information about WP-CLI in our WP-CLI Tutorial.
Installing and activating a plugin using WP-CLI is actually very easy. All you need to do is follow these steps:
- Enable SSH access for your account, and connect to it via SSH.
- Once connected to your account via SSH, navigate to the directory of your WordPress installation. If WordPress is installed on your main domain, you need to navigate to the ~/www/www directory of your account with the following command:
cd ~/www/www - If you want to install a plugin that is available in the WordPress repository, you should find the slug of the plugin. For example, the slug of the Elementor Website Builder plugin is elementor, so to install and activate this plugin via WP-CLI, you should use this command:
wp plugin install elementor --activate
The output of the command should look like this:
Installing Elementor Website Builder (3.8.1)
Downloading installation package from https://downloads.wordpress.org/plugin/elementor.3.8.1.zip...
Unpacking the package...
Installing the plugin...
Plugin installed successfully.
Activating 'elementor'...
Plugin 'elementor' activated.
Success: Installed 1 of 1 plugins.
If you wish to install and activate a plugin that is not available in the WordPress repository, you will have to obtain it as a ZIP file from its vendor and upload that ZIP file to your account. You can find instructions on how to upload files to your account in the Uploading files section of our online documentation. For example, if you have a plugin as a ZIP file named new_plugin.zip that is uploaded to the Private directory of the account, you should use the following WP-CLI command to install and activate that plugin:
wp plugin install ~/private/new_plugin.zip --activate
You should see a result like the following:
Unpacking the package...
Installing the plugin...
Plugin installed successfully.
Activating 'new_plugin-slug'...
Plugin 'new_plugin-slug' activated.
Success: Installed 1 of 1 plugins.
If you have already installed the plugin and only wish to activate it, execute the following command, and ensure that you replace new-plugin-slug with the actual slug of the new plugin:
wp plugin activate new-plugin-slug - You have successfully installed and activated the plugin.
Installing a WordPress plugin by uploading it to your account and activating it
The methods listed so far were very easy to follow and use as they allow you to install plugins with the WordPress built-in plugin wizard or a single command via WP-CLI. The next method is more cumbersome as it requires manually downloading the plugin to your device, manually uploading it to your hosting account, and activating it via the WordPress built-in plugin wizard or WP-CLI. To use this manual approach, you should:
- Obtain the files of the plugin from its vendor, which should be compressed into one .ZIP archive file.
- Get the archive containing the plugin files in the /wp-content/plugins directory of your WordPress website in the account. For example, you will need to upload the archive to the ~/www/www/wp-content/plugins directory if your website is on the main domain of your account. You can do this with the hosting Control Panel > File Manager section or an FTP program. Step-by-step instructions on the process of uploading files to your account are available in the Uploading files section of our online documentation.
- After the plugin archive is uploaded, decompress the archive using the hosting Control Panel > File Manager section by following the instructions from our File Manager article. By default, the plugin files will be located in a directory with the plugin slug, and it is recommended to keep that structure for maintenance reasons. For example, if your plugin's slug is new-plugin-slug, the plugin's files should be in the ~/www/www/wp-content/plugins/new-plugin-slug directory of the account.
- Finally, you will have to activate the plugin. You can do this via the WordPress Dashboard or via WP-CLI.
Where to find all plugins already installed on WordPress?
You can find a list of all installed plugins on your WordPress website in the WordPress Dashboard, using WP-CLI, or by checking the wp-content/plugins folder.
The list of installed plugins in the WordPress Dashboard can be found within the Plugins > Installed Plugins section.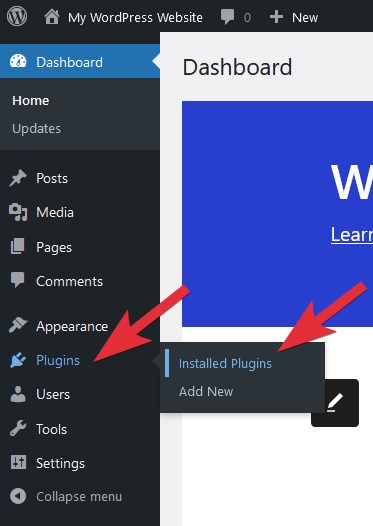
Using WP-CLI, you can retrieve a list of all plugins installed on your WordPress website by following these steps:
- Enable SSH access for your account, and connect to it through SSH.
- Go to the directory where your WordPress installation resides. If you have WordPress installed on your main domain, you need to go to the ~/www/www directory of your account, and the command that you should use is:
cd ~/www/www - Use the following WP-CLI command to have a list of all installed plugins displayed in the command line interface:
wp plugin list
The last way to find a list of all plugins installed in your account is to check the contents of the wp-content/plugins/ directory of WordPress (e.g. the exact directory will be ~/www/www/wp-content/plugins if WordPress is installed on your main domain). You can use the hosting Control Panel > File Manager section or your favorite FTP/SSH client to do this. More details on how to use the File Manager or how to connect via FTP are available in the Uploading files section of our online documentation.
Note: Plugins that are essential for the operation of your WordPress website (e.g. plugins that came bundled with your theme or another plugin) are known as "Must-use" plugins. It is recommended that you do not delete/deactivate these plugins as your website may stop working correctly. You can learn more about this type of plugins in the What are must-use plugins? section of this article.
How to update a WordPress plugin?
It is important to keep all software applications installed on your account up to date as new versions usually include performance, security, or other improvements. However, you should always keep in mind that with every update the source code of the plugin is changing, so your website may start displaying warnings, errors, or even stop working altogether due to the changes. That is why we strongly recommend that you have a backup of your working WordPress installation before applying updates, and that you check your website for issues after updating any plugins. We generate full account backups automatically twice per day and keep them for seven days, which should have you covered in most cases. To be extra safe and make sure there is minimal data loss should an update cause any problems, we would advise that you create a personal backup right before you process the update. In our Creating, downloading, and restoring from WordPress backups article, you can find instructions on how to create and restore from WordPress backups very quickly through the hosting Control Panel.
With commercial or custom-built plugins, you may be required to perform manual actions to perform updates (like installing additional plugins, downloading the latest version of the plugin from the vendor's website and installing it, or making changes to your WordPress core files, theme, or other plugins). There are many commercial plugins which also support updates via the Updates section or the plugin's page within the WordPress Dashboard. For such plugins, you should refer to the vendor's manual on how to apply updates correctly.
Utilizing automatic plugin updates
Automatic updates are supported by a lot of WordPress plugins, which is very convenient, but it can also result in unexpected website downtime, and that is why this feature is disabled by default. Automatic updates can be enabled via the WordPress Dashboard and WP-CLI.
WordPress will check for new versions of automatic updates two times per day by default. If an update is available for a plugin with enabled automatic updates, you will be able to see the time left before the plug gets updated automatically within the WordPress Dashboard > Plugins section in the Automatic Updates column. Upon completion of the automatic update, the WordPress installation will generate an email message and send it to all website owners.
One way to enable the automatic updates for a plugin is through the WordPress Dashboard by following these steps:
- Access your WordPress Dashboard.
- Go to the Plugins > Installed Plugins section.

- Click on the "Enable auto-updates" link next to the plugin that you wish to update automatically.

- WordPress will try to automatically update the plugin.
You can also enable automatic updates for a WordPress plugin using WP-CLI. Here is how to do it:
- Enable SSH access for your account, and connect to it via SSH.
- Once connected, go to the directory of your WordPress installation. You should go to the ~/www/www directory of your account if you have installed WordPress on your main domain. To do this, use the following command:
cd ~/www/www - In the directory of your WordPress directory, run the following WP-CLI command to enable automatic updates for all activated plugins:
wp plugin auto-updates enable $(wp plugin list --status=active --field=name)
If you wish to enable automatic updates for all plugins installed on your WordPress website, you can use the following WP-CLI command:
wp plugin auto-updates enable --all --disabled-only - You have successfully enabled automatic updates for your WordPress plugin/s.
Updating plugins via the hosting Control Panel > WordPress Manager
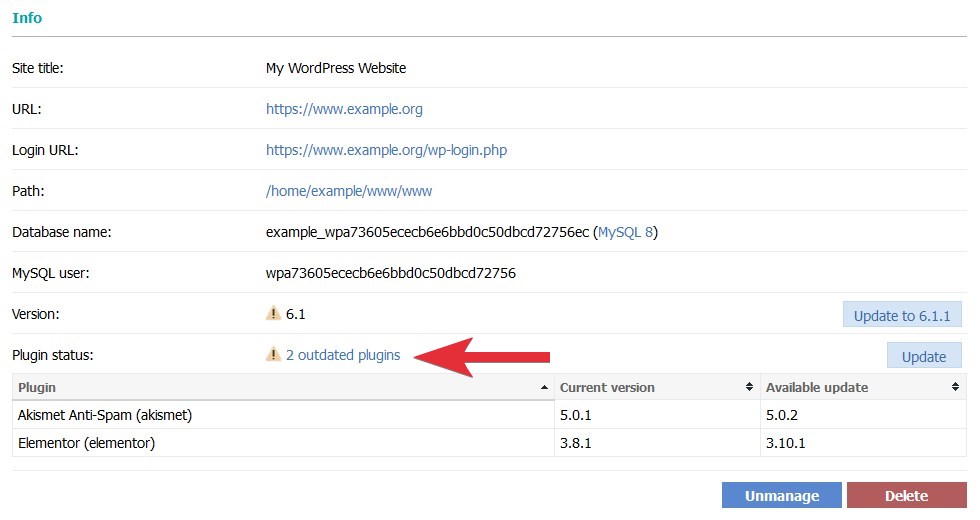
By opening the management page for a particular WordPress website via the hosting Control Panel > WordPress Manager, you can see if the WordPress core and plugins are running the latest available versions.
If updates are available for some plugins, a link showing the exact number of outdated plugins will be listed. By clicking on the link with the number of plugins that can be updated, a table will appear showing the names of the outdated plugins and their current and latest versions. To update these plugins, just click on the Update button on the right.
In case all plugins are up to date, an ![]() (OK) icon will be displayed alongside a message that all of your plugins are running the latest available version.
(OK) icon will be displayed alongside a message that all of your plugins are running the latest available version.
![]()
Note: The WordPress Manager relies on WP-CLI to determine if a newer version is available for a plugin, so the update feature may not work correctly for some commercial plugins.
Updating a plugin through the WordPress Dashboard
The preferred way to update plugins is through the WordPress Dashboard > Updates section:
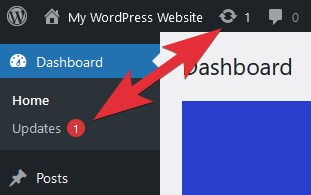
There you can find all elements of your WordPress website with pending updates. Under the Plugins section, you can select the outdated plugins that you would like to update. After that, click on the Update Plugins button: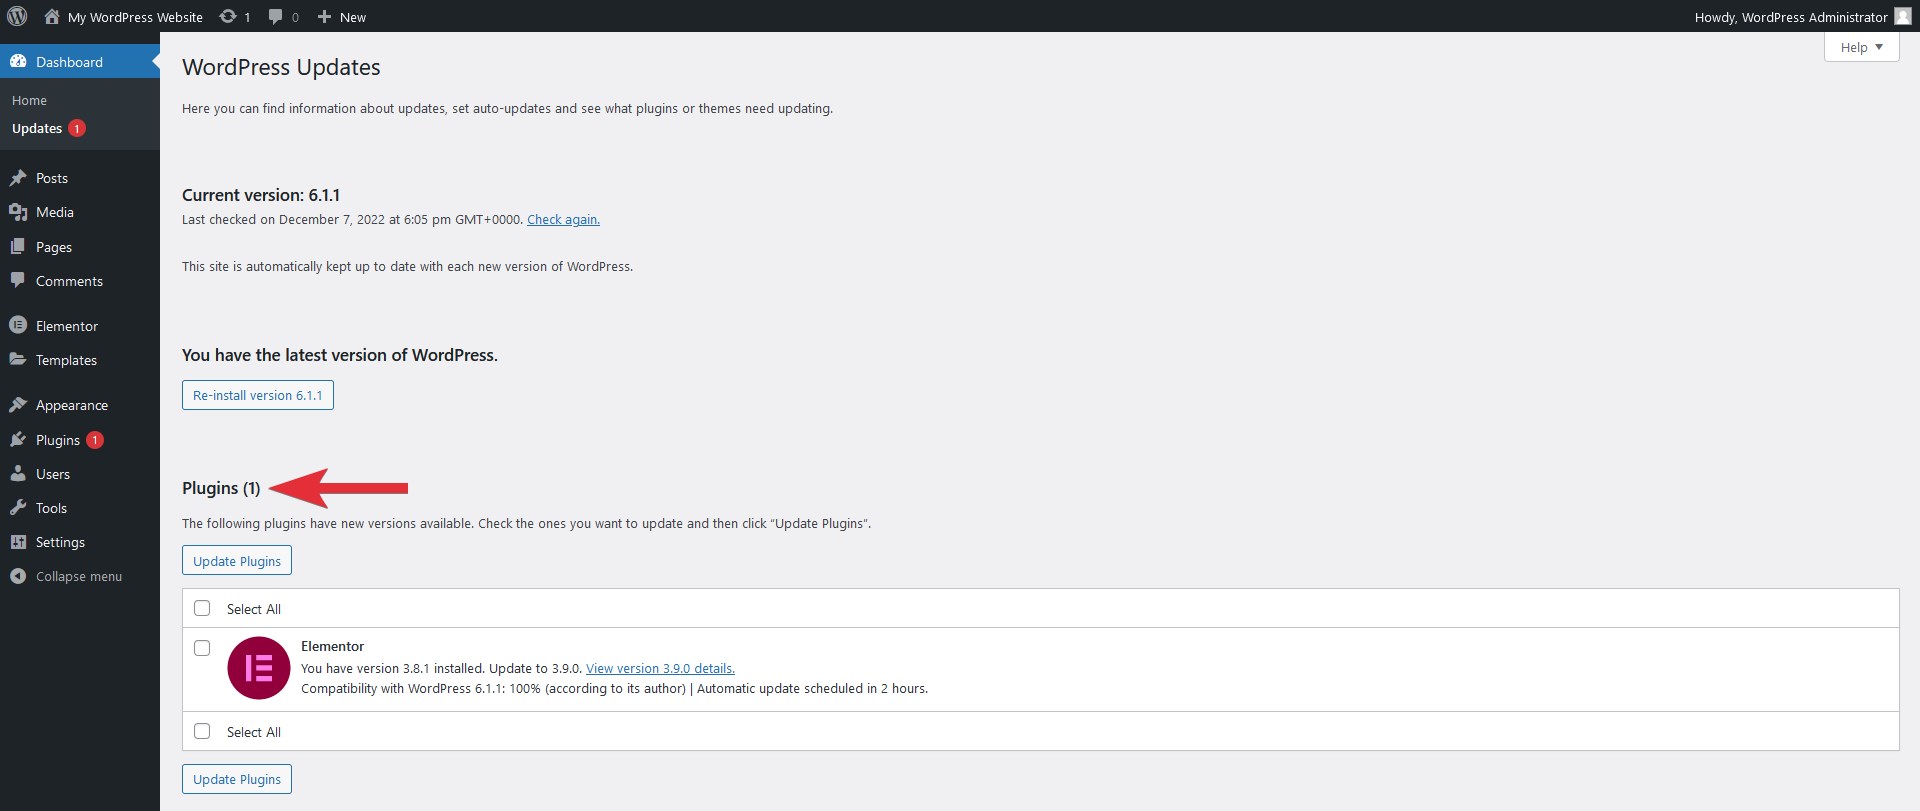
Alternatively, you can update plugins one by one from the Plugins > Installed Plugins section of the WordPress Dashboard by using the update now link within the plugin's information box:

After the updates are ready, you should see a success message like the following if you used the Dashboard > Updates section:
or the following message if you updated a plugin through the Plugins > Installed Plugins section:
Updating a plugin with WP-CLI
If you wish to update a WordPress plugin using WP-CLI, there are just a few simple steps that you need to take:
- Enable SSH access for your account, and establish connection to it via SSH.
- Once logged into your account via SSH, you need to navigate to the directory of your WordPress installation. If WordPress is installed on your main domain, you will need to navigate to the ~/www/www directory of your account by using this command:
cd ~/www/www - To update all plugins with pending updates, you can use this WP-CLI command:
wp plugin update --all
If you wish to update only your active plugins, you can do it with the following WP-CLI command:
wp plugin update $(wp plugin list --status=active --field=name)
To update just a specific plugin, you will need to find its slug, which is possible by listing all outdated plugins installed on your WordPress website with this command:
wp plugin list --update=available --field=name
For example, the output from the command should look like this if there is only one outdated plugin named Elementor (with slug elementor):
elementor
Using the slug of the plugin (e.g. elementor for the Elementor plugin), you can update it with the following command:
wp plugin update elementor
Note: Make sure to replace the elementor string from the example above with the slug of the plugin that you wish to update.
If the newer version of a plugin is not available in the WordPress repository (e.g. a commercial plugin), but it was provided to you as a ZIP file from the plugin developer or vendor, you will need to upload that file to your account. Instructions on how to upload files to your account are available in the Uploading files section of our online documentation. If the newer version of the plugin is in a new_plugin.zip archive file that you have uploaded to the Private directory of the account, you can update the plugin with the following WP-CLI command:
wp plugin install ~/private/new_plugin.zip --force - A message should be displayed indicating the result of the update process.
Updating a plugin via the File Manager or FTP
To have a plugin updated through the File Manager or FTP, you should replace the directory (and files) of the outdated version of the plugin with the directory (and files) of the latest version of the plugin. This means that updating a plugin is basically identical to installing a new plugin, which is covered in the Installing a WordPress plugin by uploading it to your account and activating it section of this article. The only differences are that you will not need to activate the plugin after the update (for WP-CLI, you will have to remove the --activate string from the command), and that you will need to remove the contents of the outdated plugin from the account prior to the update or just upload the latest version of the plugin and overwrite the existing files of the outdated plugin with the files of the newer version of the plugin.
How to downgrade a WordPress plugin?
Using outdated software is not advisable due to performance, compatibility, and security concerns, so you should downgrade a plugin to an older version ONLY if:
- Your WordPress website or some of its vital functions or features stopped working after a plugin update.
- You have reported the problem to the vendor or developer of the software application, so they can release a new version of the plugin where the problem is addressed.
- You have checked all possible sources that may be able to offer a permanent or temporary solution to the problem without downgrading the plugin - the vendor/developers/community of the plugin, the WordPress forums, or other communities that could potentially have information, like WordPress Stack Exchange.
If the latest version of a plugin causes only minor issues like PHP warnings in the WordPress Dashboard, you can ignore them if they do not cause any inconvenience to your website audience. If any PHP warnings, for example, are displayed on your website, you can disable the reporting of errors for PHP scripts via the hosting Control Panel > PHP Settings section.
Downgrading a plugin via the WordPress Dashboard
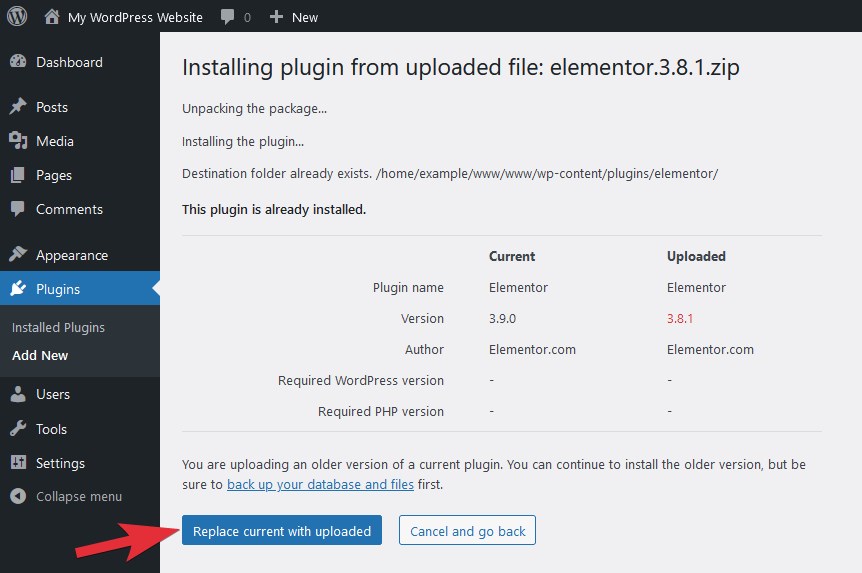
The process of downgrading a plugin via the WordPress Dashboard is almost identical to the process of Manually installing a plugin via the WordPress Dashboard described earlier in this article. The only difference is that an extra screen will be displayed with information about the current version and the uploaded older version of the plugin. To downgrade the plugin from the currently installed version to the uploaded older version, you just need to click on the Replace current with uploaded button.
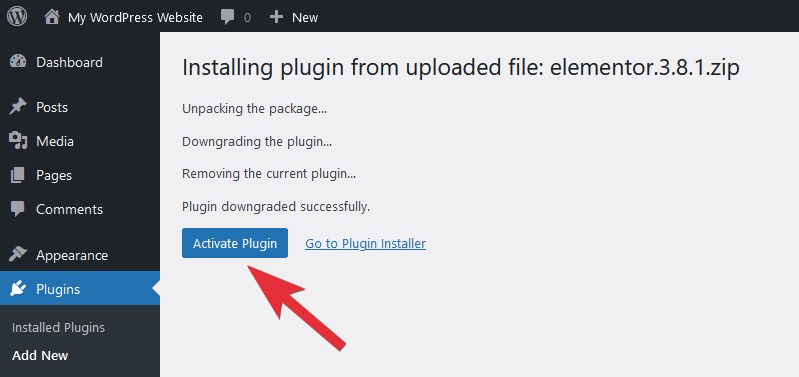
After the old version of the plugin is installed, you have to activate it by clicking on the Activate Plugin button.
Downgrading a plugin via WP-CLI
Downgrading a WordPress plugin using WP-CLI is very easy and uses the wp plugin install command. Just follow these steps:
- Enable SSH access for your account, and connect to it via SSH.
- After you log into your account via SSH, navigate to the directory of your WordPress installation. If WordPress is installed on your main domain, you will need to navigate to the ~/www/www directory of your account by using this command:
cd ~/www/www - Use the following WP-CLI command to downgrade a plugin (e.g. with slug elementor) to a specific version (e.g. version 3.8.1):
wp plugin install elementor--version=3.8.1 --force
Note: You will need to replace the elementor string and the version number from the example above with the slug and version number of the plugin that you wish to downgrade. The --force option is mandatory as the command will return a message that the plugin is already installed without it and the downgrade will not take place.
If the old version of the plugin is not available in the WordPress repository (if you have to downgrade a commercial plugin, for example), but you have obtained it as a ZIP file from the plugin developer or vendor, you will need to upload that file to your account. You can find instructions on how to upload files to your account in the Uploading files section of our online documentation. If the old version of the plugin is in an archive named old_plugin_version.zip that you have uploaded to the Private directory of the account, you can downgrade the plugin with the following WP-CLI command:
wp plugin install ~/private/old_plugin_version.zip --force - After the command is executed, a message indicating the result of the downgrade process will be displayed.
Downgrading a plugin via the File Manager or FTP
You can downgrade a plugin via the hosting Control Panel > File Manager or FTP by replacing the files of the installed plugin with the files of the older version of the plugin. To achieve this, you basically have to install the older version of the plugin, which is covered in the Installing a WordPress plugin by uploading it to your account and activating it section of this article. The only difference between downgrading a plugin and installing a new one will be that, as part of the downgrading process, you should delete or overwrite the files of the currently installed version. Since the plugin should already be activated, it will not be necessary to activate it after the downgrade.
How to deactivate a WordPress plugin?
We strongly recommend that you delete all deactivated plugins from your WordPress website. This is important as bad actors can use vulnerabilities of both activated and deacticated themes and plugins to abuse your website and account. You can find instructions on how to delete a plugin in the How to delete a WordPress plugin? section of this article.
Important: Since some plugins modify core files or functions of WordPress, they can continue to affect your WordPress installation even after they are deactivated. For this reason, you should always try to disable all features of the plugins that you plan to deactivate within their management page inside the WordPress Dashboard before deactivating the plugins. You should also consider removing any data generated by the plugins (depending on the plugin, this could be forms, pages, contacts, etc.) within their management page within the WordPress Dashboard to have these entries removed from your database, as otherwise these entries will remain in your database forever as obsolete records.
Deactivating a plugin through the WordPress Dashboard
To deactivate a WordPress plugin, you can go to the Plugins > Installed Plugins section of the WordPress Dashboard and click on the Deactivate link.
After that you should see a notification indicating that the plugin has been deactivated successfully.
Deactivating a plugin using WP-CLI
Another way to deactivate a plugin is via WP-CLI by following these steps:
- Enable SSH access for your account, and connect to it through SSH.
- Go to the directory where your WordPress installation resides. If you have WordPress installed on your main domain, you need to go to the ~/www/www directory of your account, and the command that you should use is:
cd ~/www/www - In case you want to deactivate just a single plugin (e.g. a plugin with slug unused_plugin_slug), you should use the WP-CLI command listed below:
wp plugin deactivate old-plugin-slug
If you do not know the exact slug of a plugin, you can use the following command to retrieve a list of all plugins installed on your WordPress website:
wp plugin list
Deactivating all plugins via the hosting Control Panel > WordPress Manager
Should you need to deactivate all plugins for your WordPress website, the fastest way to do this is via the hosting Control Panel > WordPress Manager. Detailed instructions on the process are available in our Disabling all WordPress plugins article.
How to delete a WordPress plugin?
If you need to delete a plugin from your WordPress website, this can be achieved in one of three ways: through the WordPress Dashboard, using WP-CLI, or by deleting the plugin's folder from your account. We strongly recommend that you delete all plugins that you do not use or do not intend to use.
Important: Some plugins modify existing or add new files to your WordPress installation that are outside the plugin's folder. Some of the most commonly changed files are the .htaccess, wp-config.php, php.ini, or .user.ini files in the root WordPress folder (e.g. the ~/www/www folder of your account if WordPress is installed on your main domain). If new files are created by the plugins, they are also usually stored in the root folder of WordPress. After you delete or disable such plugins, it is possible that they will not perform a full cleanup, and the changed or created files may remain, and may cause your website to stop working at that moment or at a later stage without there being any obvious reason. It is also possible for plugins to leave obsolete records in your database after being deleted or deactivated. You should be able to find information about such issues and how to fix them in the official documentation or community forums of the specific plugin. Alternatively, you can simply disable all settings and features of the plugin as explained earlier in the How to deactivate a WordPress plugin? section of this article.
Deleting a plugin through the WordPress Dashboard
To delete a plugin using the WordPress Dashboard, you need to log in as an administrator to your WordPress website. After that, you should navigate to the Plugins > Installed Plugins section and click on the Delete link below the name of the plugin you wish to delete.
Note: The Delete link is displayed only for deactivated plugins, so if you do not see the Delete link, you should first deactivate the plugin.

A prompt will appear asking you to confirm your action. Click on the OK button, and the plugin will be deleted.
Deleting a plugin using WP-CLI
You can delete plugins using WP-CLI by following these simple steps:
- Enable SSH access for your account, and connect to it via SSH.
- Navigate your WordPress installation's directory. This will be the ~/www/www directory of your account if WordPress is installed on your main domain. You can navigate to this folder using this command:
cd ~/www/www - If you wish to delete all disabled/deactivated plugins from your WordPress website, you can use the following WP-CLI command:
wp plugin delete $(wp plugin list --status=inactive --field=name)
In case you want to delete just a single plugin (e.g. a plugin with slug unused_plugin_slug), you should use the WP-CLI command listed below:
wp plugin delete unused_plugin_slug
You can find the slugs of the plugins installed on your WordPress website with the following WP-CLI command:
wp plugin list
Note: WP-CLI can be used with the --force option to delete plugins that cannot be deleted by default or for some other reason. Please use this option with care as you may potentially break your website with it.
Deleting a plugin via the File Manager or FTP
Important: You should use this method only if you are very familiar with the WordPress directory/file structure as deleting plugins this way is very likely to result in errors on your website or even downtime. We recommend that you create a WordPress backup of your website via the hosting Control Panel > WordPress Manager as explained our Creating, downloading, and restoring from WordPress backups article if you plan to use this method.
You can delete a plugin via the hosting Control Panel > File Manager section, or via FTP by deleting its directory from the /wp-content/plugins directory of your WordPress website in the account. If WordPress is installed on the main domain of your account, you will find the plugins in the ~/www/www/wp-content/plugins directory. Go to that directory with the File Manager section or your FTP program of choice, and delete the directory. Details on how to connect to your account via FTP are available in the Uploading files section of our online documentation.
After deleting a plugin this way, the first time you open the WordPress Dashboard > Plugins > Installed Plugins section a notice will be displayed indicating that the plugin files cannot be found:
How to perform bulk actions with plugins?
You can use the Plugins > Installed Plugins section of the WordPress Dashboard to manage all or select plugins quite easily. Just mark the checkboxes next to the plugins that you wish to manage, choose the action that you wish to perform from the Bulk actions drop-down menu, and click on the Apply button next to it. You can mark the topmost checkbox to select all plugins. The Bulk actions drop-down menu allows you to perform the following actions for the selected plugins:
- Activate
- Deactivate
- Update
- Delete
- Enable Auto-updates
- Disable Auto-updates

WP-CLI can also be used to perform actions for multiple or all plugins at once. To perform actions for all installed plugins, simply add the --all option to the WP-CLI command. For example, to deactivate all installed plugins, you can execute this command:
wp plugin deactivate --all
To perform an action for multiple plugins at once, you have to list the slugs of the plugins one after the other. If you wish to deactivate the Elementor plugin (with slug elementor) and the Akismet plugin (with slug akismet), you have to execute the following WP-CLI command:
wp plugin deactivate elementor akismet
What are must-use plugins?
If one or multiple plugins are essential for the operation of a WordPress website, theme, or another plugin, it is best they be configured as must-use WordPress plugins. "Must-use" plugins are always enabled and cannot be managed via the WordPress Dashboard > Plugins > Installed Plugins section. The must-use plugins reside in a special directory (by default, the directory is wp-content/mu-plugins within the root directory of your WordPress website), and they will be displayed with Status mu-plugin in the plugin list that can be obtained with WP-CLI. The best way to update such plugins is by updating the theme or plugin they were installed with and that relies on them. Alternatively, you can manually update them via the hosting Control Panel > File Manager section or FTP, but this may cause your website to return errors or stop working correctly. Please check the official article on Must Use Plugins at WordPress.org to learn more about their benefits and specifics.
Note: We recommended that you do not delete/deactivate "Must Use" plugins for your WordPress website as it may stop working correctly.
How to handle issues with a WordPress plugin?
A plugin that you have been using on your WordPress website can stop working partially or fully for many reasons, and it may even break your website. Most often this happens due to compatibility issues after an update of the WordPress core, the active theme, or the plugin in question. It is also possible for a plugin to stop working correctly due to compatibility issues after a new plugin is installed or another one gets updated. This is especially true after WordPress 5.6 where the automatic core updates policy has changed from performing only minor version updates to both minor and major version updates.
Important: The best defense against plugin issues is to always keep the WordPress core, the active theme, and all installed plugins updated to the latest version as this is one of the main reasons newer versions are usually released.
If you can determine which plugin is causing problems, you can try to deactivate it and activate it again, or you can try to re-install it to see if this will resolve the problem. More details on how to perform these actions are available in the How to deactivate a WordPress plugin?, How to delete a WordPress plugin?, and How to install and activate a WordPress plugin? sections from this article. If the issues appeared after a recent plugin update, you can downgrade the plugin to a previous version by following the steps listed in the How to downgrade a WordPress plugin? section from this article.
It is not always possible to find which plugin or combination of plugins is causing problems, so you can temporarily disable all plugins using the hosting Control Panel > WordPress Manager and start enabling them one by one to find the faulty plugin/s. This solution can also be used if you are having problems accessing the WordPress Dashboard after a recent plugin update.
If the problem remains after trying the aforementioned methods, you can try to restore your website from a WordPress backup or restore your website files and database from a system backup. We would strongly recommend that you create a manual WordPress backup via the hosting Control Panel > WordPress Manager just in case something else goes wrong. More information about using the backups created through the WordPress Manager are available in our Creating, downloading, and restoring from WordPress backups article.
You can reach out to the community, support team, or developers of the plugin for advice on how to solve the particular problem you encounter. They should have sufficient knowledge about the plugin. You can also search for help in the WordPress community, but assistance may be limited there especially for plugin-specific issues.
How to secure a WordPress plugin?
Both free and commercial WordPress plugins are generally secure as their developers are informed if a vulnerability is found and reported in the WordPress community. However, it is up to the developers to release new versions of their plugins in such events. In general, it is less likely for commercial plugins to get affected as their source code is not publicly available.
To ensure that your plugins are not potential security hazards for your WordPress installation and account, you should always:
1. Get your WordPress plugins from a legitimate source
Free plugins are publicly available in the WordPress plugin repository, and can be downloaded and installed very easily. Commercial plugins should be purchased and downloaded ONLY from their official vendors or resellers. This way you will get the latest and non-modified versions of the plugins as intended by their authors.
Many leaked or pirated versions of both free and commercial plugins can be found online, and almost always they contain malware or malicious code that allows unauthorized access to the files and databases of your website and hosting account. With such access, the bad actors can retrieve private information from your website and account for blackmailing purposes or use your website and account for other malicious intents like hosting of phishing websites, sending spam messages, or attacking/scanning remote websites and networks.
2. Regularly update and maintain your WordPress plugins
The second most important measure you can take is to regularly update all plugins installed on your WordPress website. Plugin authors usually try to release new versions to introduce new features, but the most common reasons for releasing a new version are security, stability, and/or performance improvements.
It is a common practice for WordPress administrators to only update the enabled plugins on their website; however, disabled plugins should also be updated regularly as the files of all installed plugins (no matter enabled or disabled) exist on the server, and they can be used as an attack vector by third parties.
Detailed instructions on the process of updating your plugins are available in the How to update a WordPress plugin?section of this article.